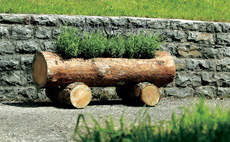
A home-made flower trough created from a tree trunk is a decorative feature in any garden. Here we show you the professional way to make it.
Step 1 of 6: Chock the round timber with wooden wedges or similar to prevent it from rolling away. Now mark out the interior size with chalk on the face of the log and mark the cutting line all the way round. Then saw the face edges first (face edge thickness approx. 15 cm).
Step 2 of 6: Then create the long sides. Start by making a superficial cut to mark the longitudinal cuts. Then apply the machine flat and plunge the tip in until the required depth is reached.CautionThere is a greater risk of kickback when making a plunge cut. It is essential to observe the safety precautions in the Instruction Manual and to use this technique only if you are experienced in it.
Step 3 of 6: Now cut the faces: hold the machine vertically and plunge, sawing through all the way to the previously made longitudinal cut. Do the same thing on the other side.
Step 4 of 6: When you have made the outer walls of the trough, make 3–4 parallel lengthways cuts in the middle, all the same depth. Also saw diagonally 3 to 4 times through the centre area which you are going to hollow out.
Step 5 of 6: The resulting chunks of wood can then easily be chopped out with the hatchet and removed. Wood residues, fiber material or minor unevennesses in the base can if necessary be rectified with the hatchet.
To avoid waterlogging, saw right through the base in several places using the tip. Support the trough on the sawhorse so that the saw does not hit the ground (damages the chain).
Step 6 of 6: Now make the feet. Make a v-shaped cut in each of the two small pieces of round wood to fit the trough and fasten in place with the screws.
Now all that's needed is to dress it up with plants and flowers.